Quantcast
Channel: Chilkat Tech Notes
Viewing all 414 articles
Browse latest View live

Parsing Extremely Large XML Files

$
0
0

Question:

I’m trying to read a very large xml file. It’s about 500MB. The content is a list of records. There are about 100,000 nodes with the same tag that contain single records.   Is there a limit on the file size or number of nodes that can be processed?

Answer:

There is no limit other than running out of memory.  Using a DOM style XML parser for extremely large XML files containing a huge number of elements (nodes) is not a good choice.  A DOM style parser (Document Object Mode) is where the entire XML document is loaded into memory and stored in some sort of document object model.

A better choice would be to use a SAX style parser.  See https://en.wikipedia.org/wiki/Simple_API_for_XML

Opinion:  

In my opinion, a format such as XML should never be used for huge datasets.  The original mistake was when the software architect decided to use XML as the data storage format.  Repeating the same opening and closing XML tags severely bloats the data and imposes huge memory and database storage requirements that could’ve been avoided.


Mismatch between the processor architecture of the project being built “MSIL” and the processor architecture …

$
0
0

Question:

When building my C# solution I get the following warning on several of the projects:


Severity Code Description Project File Line Suppression State
Warning There was a mismatch between the processor architecture of the project being built “MSIL” and the processor architecture of the reference “ChilkatDotNet47, Version=9.5.0.75, Culture=neutral, PublicKeyToken=ab5fc1f999ef09bd, processorArchitecture=AMD64”, “AMD64”. This mismatch may cause runtime failures. Please consider changing the targeted processor architecture of your project through the Configuration Manager so as to align the processor architectures between your project and references, or take a dependency on references with a processor architecture that matches the targeted processor architecture of your project. MyTestProject


Please could you advise if you  have a build that is MSIL compatible?


Answer:

The Chilkat .NET assembly is a mixed-mode assembly, meaning that it’s a managed layer on the outside, but with a native inner-core (C++ compiled to native code). Therefore, it cannot exist as an “Any CPU” assembly and must exist in 32-bit or 64-bit form. In your C# application’s project Properties, look at the options under the “Build” tab, as shown in the image below. When “Any CPU” is chosen, you will get the warning. The warning may be ignored if it’s the case that when the application actually runs it has the correct 32-bit or 64-bit assembly to load.

You’ll notice a “Prefer 32-bit” checkbox. This is checked by default. It means your application will always run as a 32-bit process, even on 64-bit machines. If this is the desired behavior, you may target the application for x86 (32-bit) because it will always be running as 32-bit anyway. You would reference the 32-bit Chilkat assembly, and there would be no warning.

Or you may uncheck “Prefer 32-bit”, target x64, and reference the 64-bit Chilkat assembly. This would also eliminate the warning. Finally, you may keep “Any CPU” and ignore the warning — just make sure that at runtime the correct matching DLL (32-bit or 64-bit) is present and loaded.

Also, see this for dynamically loading the correct .NET assembly at runtime: http://www.cknotes.com/dynamically-loading-net-assembly-32-bit-or-64-bit/


MS CNG NCryptSignHash returns 0x80090020

$
0
0

We’ve seen this error when trying to sign using a smart card:

msCngSignWithCert
    Acquired CNG private key.
    dwKeySpec: 0xffffffff
    key is CERT_NCRYPT_KEY_SPEC
    setSmartCardPin:
        setting smart card pin...
    --setSmartCardPin
    Using PKCS1 padding.
    msCngSign.NCryptSignHash failed.
    failed to sign.
    secStatus: 0x80090020
--msCngSignWithCert

The 0x80090020 error is a generic “NTE_FAILED: An internal error occurred”. See https://docs.microsoft.com/en-us/windows/desktop/com/com-error-codes-4

To clarify: Chilkat calls the Microsoft CNG (Cryptographic Next Generation) API, and CNG interacts with the smart card CSP (Cryptographic Service Provider). In other words, it’s like this: Chilkat –> Microsoft CNG –> Atos CardOS API v5.4

The CNG function that is returning the error is NCryptSignHash. See https://docs.microsoft.com/en-us/windows/desktop/api/ncrypt/nf-ncrypt-ncryptsignhash

It seems that the error is caused by an expired smart card.

In a particular test case, the problem occurs for an expired smart card, but there is no problem for a non-expired smart card (using the same smart card vendor).


Amazon S3 Problem Resolution Hints

$
0
0

This post describes two problems and solutions for Amazon S3 that were recently encountered:

(1) A Chilkat user found that the 1st HTTP request had a delay of 5 seconds, and then subsequent requests had no delay.  Here’s what was found (reproduced with permission from the Chilkat user):

I thought you might be interested to know that the long lookup times (which were variable) I was seeing when using Chilkat.Http – http.GetHead(url) to check the existence of images in an AWS S3 bucket, were caused by a misconfigured DNS server in our Amazon VPC. The first request was often being sent off to find the DNS in the wrong place, which it did in a circular fashion taking about 4 seconds, then the cached response was used for the next requests.

Took a while to figure out with the help of Amazon support.

In general — if a problem is encountered with any Internet communications where the 1st request takes much longer than subsequent requests — suspect a DNS problem.

(2) A Chilkat user was trying to upload to S3 a 700MB file and encountered this error:

                  sendFile(47ms):
                    filePath: …
                    processAlert:
                      TlsAlert:
                        level: warning
                        descrip: close notify
                      --TlsAlert
                    --processAlert
                    Received close-notify.
                    Did not receive additional application data.
                    Already received close-notify.
                    terminateConnection:
                      TCP connection cleanly closed by peer.
                      Cleanly terminated TCP connection.
                    --terminateConnection
                    Failed to write bytes.
                    Failed to write data to output.
                  --sendFile

Cause and Solution:  HTTP connections can stay open for multiple requests.  If an HTTP response does not include the “Connection: close” header, then Chilkat will keep the connection open and use it for subsequent requests (including S3).  However, if enough time passes before the next request, the HTTP server may choose to disconnect the idle connection.   This is what happened.

In this case, the call to Http.S3_Upload was not the first request.  The connection to the S3 server was open when S3_Upload was called.  However, S3 uploads require a SHA256 hash of the data being uploaded.  To SHA256 hash 700MB (in this case) took a little less then 30 seconds, and this delay was enough for the server to decide to disconnect because the connection was idle.  This causes the above error.

The solution is to call Http.CloseAllConnections prior to uploading a large file.

Chilkat will be adding an internal feature for the next version to track the connection idle time and automatically discard/recover the connection to avoid this pitfall.


Use Chilkat for the *** REST API?

$
0
0

Question:

Have you ever worked with Avalara Tax Software?  I need to write an interface between our application and Avalara.  Do you know if I could use the Chilkat REST API to write the interface?

Answer:

Yes, you can use Chilkat REST to call any REST API.   A good way to go about it is to see if the REST API provider publishes reference documentation in the form of CURL statements.  Avalara provides it.  For example, go to https://developer.avalara.com/api-reference/avatax/rest/v2/methods/AvaFileForms/CreateAvaFileForms/ , scroll down, and click on “Example CURL Request to expand it.

In a separate browser tab/window, go to http://tools.chilkat.io/curl.cshtml    Paste the CURL command into the online form to generate the source code.

Also.. check the vendor’s REST API reference documentation for a sample response.  Avalara provides sample responses.  You can paste the sample response into the online tool.  Also specify the type of response (JSON or XML) in the dropdown.  The tool will also generate code to parse the sample response.

Binary vs Text Transfers (SFTP / FTP)

$
0
0

This post clarifies the topic of binary vs. ascii uploads/downloads for SFTP (Secure File Transfer over SSH) and FTP.

Binary mode transmits bytes exactly as-is.   Text mode (also known as “ascii” mode) can modify line endings (CR’s and LF’s) to the canonical convention used on the remote system.  For example, Linux systems typically use bare LF line-endings, whereas text files on Windows typically have CRLF line endings.

The default transfer mode for Chilkat is binary in both SFTP and FTP.

The client-side software (i.e. Chilkat) never explicitly modifies line endings.  For both protocols (SSH/SFTP and FTP), it is the server that may modify line endings when in text/ascii mode.

How to Switch to Text Mode for SFTP:  Methods such as UploadFileByName and DownloadFileByName always operate in binary mode.  It is not possible to use text mode w/ these simplified methods.  To transfer a file in text mode, an application would OpenFile, call Read/Write methods 1 or more times, followed by CloseHandle. For example:

// pseudo-code to upload:
string handle = sftp.OpenFile("remotePath","writeOnly","createNew, textmode");
bool success = sftp.WriteFileText(handle,"utf-8","some text...");
// make additional calls to WriteFileText if needed...
success = sftp.CloseHandle(handle);

How to Switch to ASCII Mode for FTP:  The FTP protocol is entirely different than SSH/SFTP.  An FTP session is in binary mode by default.  A command is sent to change the mode to ASCII mode.  Once changed, all subsequent transfers are ASCII mode until the mode is changed back to binary. Call SetTypeAscii to switch to ASCII mode. Call SetTypeBinary to switch to binary mode.

For example:

// In pseudo-code
success = ftp.SetTypeAscii();
success = ftp.PutFile("someDir/someFile.txt","remoteFile.txt");
success = ftp.SetTypeBinary();
success = ftp.PutFile("someDir/something.jpg","remoteImage.jpg");

You would never upload binary (non-text) files in ASCII mode — it would corrupt the files.  Unless explicitly needed, I would recommend keeping the transfer mode in the default binary mode even for text files.

Node.js Asynchronous Methods that Return Objects

$
0
0

This post shows the general technique to get the object returned by a method when it is called asynchronously.   For example, consider the Mailman.GetUidls() method.  A synchronous call to GetUidls returns a StringArray object, as shown here:

    // sa: StringArray
    var sa;

    sa = mailman.GetUidls();
    var i;
    var n = sa.Count;

    for (i = 0; i <= n - 1; i++) {
        console.log(sa.GetString(i));
    }

However, the async version of the method, GetUidlsAsync, returns a Task object. The TaskCompleted callback is called when finished. The following code snippet shows how to get the StringArray result in the TaskCompleted callback.

function taskCompleted(task) {
 
    //  A finished/completed task may be one that was canceled, aborted, or truly finished.
    //  If the task was "canceled", it was canceled prior to actually starting.  
 
    //  If the task "completed", then it ran to completion, but the actual success/failure of the method
    //  is determined by the result obtained via one of the GetResult* methods.  (A "completed" task will
    //  have a StatusInt equal to 7.   If the task finished, but was not completed, then it must've
    //  been aborted or canceled:
    if (task.StatusInt != 7) {
        console.log("Task did not complete.");
        console.log("task status: " + task.Status);
        return;
    }
 
    // The GetUidls method returns an object (namely a chilkat.StringArray object).
    // For methods that return an object, to get the returned object we'll create a new/empty
    // instance of the object, and then load it from the task.
    // In this case, the returned type of object is a chilkat.StringArray.
    var sa = new chilkat.StringArray();

    // Note: Each Chilkat class that exists as a returned object in some method call 
    // will have a LoadTaskResult method.
    // For example, chilkat.Xml, chilkat.JsonObject, and chilkat.Email 
    // each have a method named LoadTaskResult because
    // these are classes that can be returned in a method call.  
    // For example, MailMan.FetchEmail returns a chilkat.Email object.
    
    // We call LoadTaskResult to load the object with the contents of the returned object:
    sa.LoadTaskresult(task);

    // Now sa contains the UIDLs that were fetched...
    var i;
    var n = sa.Count;

    for (i = 0; i <= n - 1; i++) {
        console.log(sa.GetString(i));
    }

}
 

...
    var task = mailman.GetUidlsAsync();
    if (task == null ) {
        console.log(mailman.LastErrorText);
        return;
    }
 
    // …
    // …
 
    //  Schedule the task for running on Node's thread pool.  This changes the task's state
    //  from Inert to Live.
    // Pass the taskCompleted function so that it runs asynchronously.
    // If no arguments are passed to task.Run(), then it runs synchronously (following Node's conventions).
    success = task.Run(taskCompleted);
    if (success != true) {
        console.log(task.LastErrorText);
        return;
    }
 
    //  The application continues while the UIDls are being fetched in one of Node's worker threads.

The General Technique for Getting the Returned Object:

  1. In the taskCompleted callback, create a new instance of the type of object that would’ve been returned in the synchronous call.
  2. Load the object with the result by calling object.LoadTaskResult(task);

Never Handle non-Text Binary Data as a String

$
0
0

The bytes of a binary file, such as a JPG, PDF, etc. should never be treated as a string.  Loading a binary file into a string, and then saving back to a binary file will surely result in a different file that is corrupted.   This rule should be followed for all programming languages.  Don’t treat binary non-text bytes as text characters.

Consider this Visual FoxPro code:

LOCAL x
x = FILETOSTR( "in.pdf" )
STRTOFILE( x, "out.pdf" )

It is likely that out.pdf is corrupt. Here’s why:

When reading a text file, the bytes must be interpreted according to some character encoding.

For example, consider this character: É
In the windows-1252 character encoding, it is represented by a single byte: 0xC9
In the utf-8 character encoding, it is represented by a two bytes: 0xC3 0x89
In the utf-16 character encoding, it is represented by a two bytes: 0x00 0xC9

In this case, FoxPro is probably assuming ANSI (i.e. Windows-1252 for USA/Western European computers, 1 byte per char). Internally, FoxPro most likely holds strings in the utf-16 byte representation. Therefore, each incoming ANSI byte is converted to 2-byte per char utf-16.

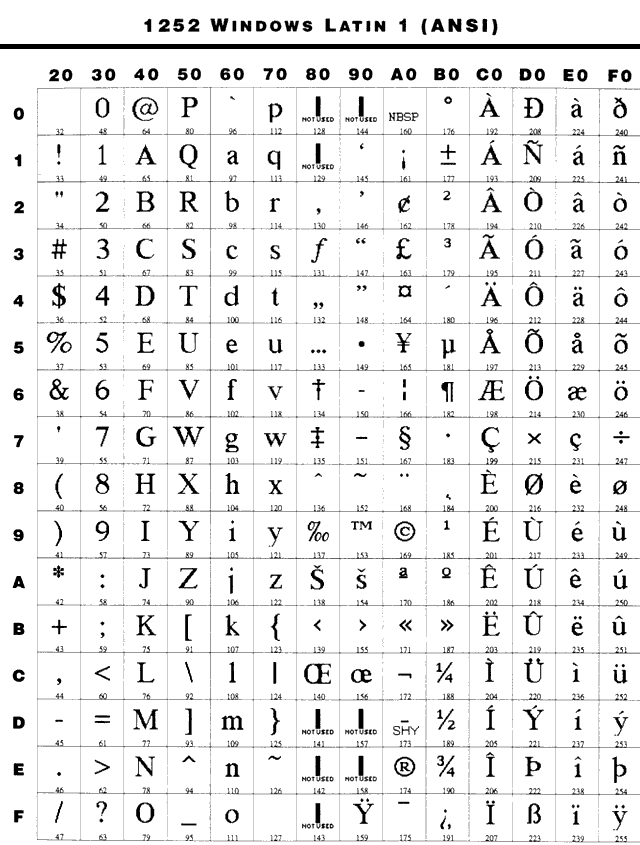
Now have a look at the Windows-1252 charset:

windows-1252

Notice the “NOT USED” bytes, such as 8D, 9D, 8E, 9E, etc.

These byte values will never appear in valid Windows-1252 text.  However, they will likely appear in a binary non-text file.  If the binary file is large enough, you can be sure these bytes will be present.  They’ll likely get converted to a “?” char.  That’s why you see “?” or some other standard char when non-text is loaded.

When you write the text back to the file, all of the “NOT USED” bytes are written as “?” chars.  This is the corruption.  By trying to handle binary data as text, incoming bytes are implicitly converted to the byte representation used to hold strings (likely utf-8 or utf-16).  Writing the file (in the case of STRTOFILE) involves an implicit conversion to the 1-byte per char ANSI representation.

The round-trip of ANSI –> Internal Representation –> ANSI corrupts the data.

Also, it doesn’t matter what charsets are involved.  It could be utf-8, utf-16, etc.  Reading a text file implicitly involves interpreting bytes according to a charset, and if those bytes don’t actually represent text in the given charset, impossible byte values or byte sequences will be present that cause some sort of error char to be substituted (or the error sequences are simply dropped), and the round-trip always results in corruption.

The rule that should never be broken is: never treat binary data as text.  Don’t use string data types to hold non-text binary data.


XAdES-BES for www.csioz.gov.pl

$
0
0

Chilkat has resolved problems relating to the creation of XAdES-BES XML signatures for documents sent to www.csioz.gov.pl.   These fixes will be available starting in Chilkat v9.5.0.76.   At the time of this post (31-Oct-2018) 9.5.0.76 is not yet released.  Contact support@chilkatsoft.com for a pre-release if desired.

Chilkat has worked with a customer to successfully sign XML files having the HL7 Clinical Document Architecture
These files look something like this:

<?xml version="1.0" encoding="UTF-8"?>
<?xml-stylesheet href="CDA_PL_IG_1.2.2.xsl" type="text/xsl"?>
<ClinicalDocument xmlns="urn:hl7-org:v3"
 xmlns:extPL="http://www.csioz.gov.pl/xsd/extPL/r1"
 xmlns:pharm="urn:ihe:pharm"
 xmlns:xsi="http://www.w3.org/2001/XMLSchema-instance"
  xsi:type="extPL:ClinicalDocument">
    
…
</ClinicalDocument>

During our development, the XML signatures produced for www.csioz.gov.pl are verified at  https://weryfikacjapodpisu.pl/index.html

To get started with adding XAdES-BES capabilities to your application (in C#, C++, Java, VB.NET, VB6, Delphi, Perl, Python, Ruby, PHP, Objective-C, FoxPro, DataFlex, C, Swift, Node.js, and other languages, go to the online tool at http://tools.chilkat.io/xmlDsigGen.cshtml  and paste a sample of already-signed XML to generate the source code required to create the given signature.  Chilkat downloads are at https://www.chilkatsoft.com/downloads.asp   Chilkat reference documentation is at https://www.chilkatsoft.com/reference.asp


Node.js Code for Checking POP3 Email

$
0
0

This Node.js sample code was graciously provided by a Chilkat user:

 _checkPop3: async function () {
    var me = this
    var ciphers = ''
    var mailman = new chilkat.MailMan()
    var count = 0
    var sa = new chilkat.StringArray()
    var bundle = new chilkat.EmailBundle()
    var email = null
    var i = 0
    var success = mailman.UnlockComponent('license')
    if (success !== true) {
      console.log('EMAIL COMPONENT UNLOCK FAILED')
      return
    }
    var cleanup = function (showLog) {
      if (mailman.IsPop3Connected === true) { mailman.Pop3EndSession() }
      if (showLog === true) { console.log('SESSION: ' + mailman.Pop3SessionLog) }
      mailman.ClearPop3SessionLog()
    }
    var doTaskAsync = function (tag, taskFunc, resultFunc) {
      return new Promise(function (resolve, reject) {
        console.log(tag + ': PERFORM TASK')
        mailman.ProgressInfo = function (name, value) { console.log(tag + ' PROGRESS: ' + name + ' = ' + value) }
        mailman.PercentDone = function (pctDone) { console.log(tag + ' ' + pctDone + '% DONE') }
        var task = taskFunc()
        if (task === null) {
          reject(new Error(tag + ': ' + mailman.LastErrorText))
          return
        }
        var success = task.Run(function (task) {
          if (task.StatusInt !== 7) {
            reject(new Error(tag + ': ' + 'TASK DID NOT COMPLETE (' + task.Status + ')'))
            return
          }
          console.log(tag + ': TASK COMPLETED')
          if (task.LastMethodSuccess === false) {
            reject(new Error(tag + ': ' + 'TASK ERROR: ' + task.LastErrorText))
            return
          }
          resultFunc(tag, task, resolve, reject)
        })
        if (success !== true) {
          reject(new Error(tag + ': ' + task.LastErrorText))
        } else {
          console.log(tag + ': TASK STARTED')
        }
      })
    }

    mailman.MailHost = me._emailCfg.host
    mailman.MailPort = me._emailCfg.port
    mailman.PopUsername = me._emailCfg.userName
    mailman.PopPassword = me._emailCfg.password
    mailman.ImmediateDelete = false
    mailman.ReadTimeout = 60
    mailman.ConnectTimeout = 60
    if (me._emailCfg.security !== 'NONE' &amp;&amp; me._emailCfg.dfltSec === false) {
      ciphers = me._emailCfg.ciphers.join(',')
      if (me._emailCfg.rsaMinSize === '1024') {
        if (ciphers.length !== 0) { ciphers += ',' }
        ciphers += 'rsa1024'
      } else if (me._emailCfg.rsaMinSize === '2048') {
        if (ciphers.length !== 0) { ciphers += ',' }
        ciphers += 'rsa2048'
      }
      if (me._emailCfg.secureReneg === true) {
        if (ciphers.length !== 0) { ciphers += ',' }
        ciphers += 'secure-renegotiation'
      }
      mailman.SslAllowedCiphers = ciphers
    }
    if (me._emailCfg.security === 'STARTTLS') {
      mailman.StartTLS = true
    } else if (me._emailCfg.security === 'SSLTLS') {
      mailman.PopSsl = true
    }

    try {
      await doTaskAsync('BEGIN', function () { return mailman.Pop3BeginSessionAsync() }, function (tag, task, resolve, reject) {
        if (task.GetResultBool() === false) {
          reject(new Error(tag + ': ' + 'TASK ERROR: ' + task.LastErrorText))
        } else {
          resolve()
        }
      })
      await doTaskAsync('RESET', function () { return mailman.Pop3ResetAsync() }, function (tag, task, resolve, reject) {
        if (task.GetResultBool() === false) {
          reject(new Error(tag + ': ' + 'TASK ERROR: ' + task.LastErrorText))
        } else {
          resolve()
        }
      })
      await doTaskAsync('COUNT', function () { return mailman.GetMailboxCountAsync() }, function (tag, task, resolve, reject) {
        var result = task.GetResultInt()
        if (result === -1) {
          reject(new Error(tag + ': ' + 'TASK ERROR: ' + task.LastErrorText))
        } else {
          count = result
          resolve()
        }
      })
      if (count === 0) { console.log('NO EMAILS TO READ'); cleanup(); return }
      console.log(count + ' EMAILS EXIST')
      await doTaskAsync('UIDLS', function () { return mailman.GetUidlsAsync() }, function (tag, task, resolve, reject) {
        sa.LoadTaskResult(task)
        if (sa.Count === 0) {
          reject(new Error(tag + ': ' + 'TASK ERROR: ' + task.LastErrorText))
        } else {
          resolve()
        }
      })
      console.log('GOT ' + sa.Count + ' UIDLS')
      await doTaskAsync('FETCH', function () { return mailman.FetchMultipleAsync(sa) }, function (tag, task, resolve, reject) {
        bundle.LoadTaskResult(task)
        if (bundle.MessageCount === 0) {
          reject(new Error(tag + ': ' + 'TASK ERROR: ' + task.LastErrorText))
        } else {
          resolve()
        }
      })
      for (i = 0; i &lt; bundle.MessageCount; i++) {
        email = bundle.GetEmail(i)
        console.log('READ ' + email.FromName + ' &lt;' + email.FromAddress + '&gt; - ' + email.Subject)
        // console.log(email.Body)
        try {
          var cache = JSON.parse(email.Body)
          if (typeof me._units[ cache.name ] === 'undefined') {
            if (me._io !== null) {
              me._io.emit('email-add', { msg: 'email-add', name: cache.name })
            }
            me._units[ cache.name ] = {}
          }
          me._units[ cache.name ].cache = cache
          if (typeof me._units[ cache.name ].cache.TS === 'undefined') {
            me._units[ cache.name ].cache.TS = Sugar.Date.create('now')
            me._units[ cache.name ].cache.TS = Sugar.Date.format(me._units[ cache.name ].cache.TS, '{yyyy}-{MM}-{dd} {HH}:{mm}:{ss}')
          }
          console.log('UPDATE FROM ' + cache.name)
          if (me._io !== null) {
            me._io.emit('email-stats-upd', { msg: 'email-stats-upd', name: cache.name, stats: me._units[ cache.name ].cache })
          }
        } catch (error) {
          console.log('INVALID UPDATE FROM ' + cache.name + ' (' + error.toString() + ')\n   ' + cache)
        }
      }
      await doTaskAsync('DELETE', function () { return mailman.DeleteBundleAsync(bundle) }, function (tag, task, resolve, reject) {
        if (task.GetResultBool() === false) {
          reject(new Error(tag + ': ' + 'TASK ERROR: ' + task.LastErrorText))
        } else {
          resolve()
        }
      })
      cleanup()
    } catch (error) {
      console.log(error.toString())
      cleanup(true)
    }
  }

CkPython vs. Chilkat2-Python

$
0
0

Question:

Should I use CKPython or Chilkat2-Python for a new development (environment = Windows and Python 3.6)
What’s the difference between these?

Answer:

The CkPython API is the original Chilkat for Python API that uses something called SWIG (swig.org) to produce the Python wrappers around the C/C++ implementation.  The result is that CkPython API has a style with more a C/C++ flavor that can be distasteful to Python developers.  The Chilkat2-Python API does not use SWIG for the wrapping and results in a more natural Python API.

For example, CkPython looks like this:

imap.put_Ssl(True)
imap.put_Port(993)
success = imap.Connect("imap.someMailServer.com")

Whereas Chilkat2-Python looks like this:

imap.Ssl = True
imap.Port = 993
success = imap.Connect("imap.someMailServer.com")

A few more notes about the differences…

  • Chilkat2-Python is not available for Python 2.6 or 2.7.  It is available for Python versions 3.0 (for some operating systems, such as Alpine Linux, it is available for 3.4 and up, but this is only because we suspect nobody actually needs the older versions of Python on these systems).
  • Chilkat2-Python uses memoryview for passing and returning binary bytes.  Coping directly with binary bytes is difficult in CkPython.
  • The CkPython download contains both a “chilkat.py” and a “_chilkat.so” that are installed to the Python site-packages directory.  The Chilkat2-Python download has no need for a “chilkat.py” wrapper and simply contains a “chilkat2.so” which is installed to the site-packages directory.

If starting fresh with Chilkat in Python, I would recommend using Chilkat2-Python.

Online XML Digital Signature Validators

$
0
0

Chilkat’s Online XML Signature Validatorhttp://tools.chilkat.io/xmlDsigVerify.cshtml

gob.es FacturaE online validator: http://sedeaplicaciones2.minetur.gob.es/FacturaE/

ETSI Signature Conformance Checker (requires credentials)  http://signatures-conformance-checker.etsi.org

Validate UBL:  https://www.moj-eracun.hr/exchange/validateubl

UBL 2.1 e-Invoice Validation: https://joinup.ec.europa.eu/solution/ubl-21-e-invoice-validation-service/about

FatturaPA (fatturapa.gov.it)  http://sdi.fatturapa.gov.it/SdI2FatturaPAWeb/AccediAlServizioAction.do?pagina=controlla_fattura

ADSS Signing Server: https://account.ascertia.com/demos/xmlsignatureverificationstep1

XmlValidation.com:  https://www.xmlvalidation.com/ I don’t trust this validator. Change the signed XML document to deliberately introduce errors and then check to see if the validator returns “No errors”. My testing, as of 6-Nov-2018, shows that signed XML w/ modifications still report “No Errors”.


Monitoring Progress of a Web Request

$
0
0

I like this article for the purpose of conceptually understanding the architecture for monitoring the progress of an HTTP web request in a Browser:  https://buildwithdjango.com/blog/post/celery-progress-bars/

Regardless of technology, programming language, etc., it boils down to this:

  1. The initial HTTP request kicks off the work/job.
  2. Some infrastructure on the server-side starts the work in a background thread (or whatever) and returns the “work started” response.
  3. JavaScript / Ajax in the HTML running in the web browser periodically sends requests to get status information.
  4. Each Ajax status request must contain information that identifies the job.
  5. The server-side infrastructure has a means to locate the job and get information about it, such as percentage completed, or final results, and respond with this information back to the client.

There are many different ways to skin this cat — perhaps web sockets are used, or different server-side frameworks, etc. but in general it follows the above flow.

One slight alternative is Server Sent Events.  See https://www.w3schools.com/html/html5_serversentevents.asp

In the case of SSE, the initial request kicks off the job, but updates flow from the server to client automatically (but does the browser support SSE?).

Anyway.. this is just to give a person a general idea of what’s involved.

Progress Monitoring HTTP Requests in Installed Apps

$
0
0

This is a note about the pitfalls of progress monitoring HTTP requests sent from an installed app (i.e. not web app running in a browser).

Ideally, we’d like to know how long an HTTP POST is going to take, and update the percent-completed visually so that when it reaches 100% the operation is neatly finished as indicated.  This turns out to be very difficult.

Problem: Methods that Both Send and Receive

The main problem has to do with methods (functions) that both send the request and receive the response.   All methods in the Chilkat.Http class both send and receive.  For example, Http.PostJson3 is a method that sends a POST w/ a JSON request body, and receives the response (which is also typically JSON).   When we begin sending the POST, we have no idea of how big the response will be, or the “think time” of the server (the amount of time it takes for the server to process the received request and begin sending the response).   Chilkat Http chooses one direction for monitoring progress.  Generally, if the HTTP request is a GET or DELETE (or something with no request body), the PercentDone is measured while receiving the response.  It is assumed that a small HTTP request is quickly sent, and as soon as the response header is received, the PercentDone events can start flowing based on the size indicated by the Content-Length header.   However, if the response is chunked, then there is no Content-Length header and the application has no way of knowing how much data is coming before the final 0-sized chunk is received.  In this case, it’s impossible to monitor PercentDone progress.

If, however, the HTTP request is a POST, PUT, etc. with a large body, such as for multipart/form-data uploads or perhaps a POST to send a large GMail (via GMail’s REST API), then the PercentDone events are based on the sending of the request.  In the case of GMail, there’s likely a long “think time”, which is unknowable, after which the response is small and quick.  This would explain the behavior if PercentDone events progressed to 100%, but then there was a significant delay until the operation was actually completed.

Chilkat REST: More Flexibility for Separating Send from Receive

Chilkat.Rest and Chilkat.Http are both classes for HTTP. Most tasks can be accomplished using either.  One reason for creating the newer Chilkat.Rest class was to provide an API that was capable of separating the send and receive into separate methods.   An HTTP request can be accomplished by three separate calls instead of one.  For example: Rest.SendReqSb, followed by Rest.ReadResponseHeader, followed by Rest.ReadRespBodyString.   This allows an application to monitor the progress of each call individually.  The problems of server “think time” and chunked responses still exist.


Accessing Private Key causes Windows to show Dialog Box – How to Suppress

$
0
0

Question:  Calling CkXmlDSigGen.SetX509Cert causes Windows to show a dialog box requesting validation.  Is it possible to avoid the dialog box?

Answer: Yes.  The reason for displaying the dialog box  is because the cert + private key was imported with the option to enable strong private key protection.  Here’s a screenshot of the Window Certificate Import Wizard showing the two checkboxes:  One for strong private key protection (meaning show a dialog box), and the other for allowing the private key to be exported.   The solution is to remote the cert + private key from the system, and re-import with the enable strong private key protection checkbox unchecked.

windows cert import wizard


Using Chilkat with la Carta Nazionale dei Servizi delle Camere di Commercio d’Italia

$
0
0

To use Chilkat for signing XML with a CNS smartcard, the certificate must be installed on the Windows system.  Chilkat uses the Microsoft CNG (Cryptographic Next Generation) to do the signing.  If the CNS smartcard certificate is installed on Windows correctly, then CNG should automatically know to use the smartcard for signing.  I cannot read Italian, but I think the instructions for installing on Windows can be found at one of these URLs:

https://www.card.infocamere.it/infocard/pub/guide-installazione_5390

http://www.progettocns.it/common/kitcittadino.aspx


HTTPS Windows Integrated Authentication

$
0
0

This example explains how to do HTTP authentication on a Windows system using the current logged-on user credentials.

Classic ASP: HTTPS Windows Integrated Authentication
C: HTTPS Windows Integrated Authentication
Chilkat2-Python: HTTPS Windows Integrated Authentication
C++: HTTPS Windows Integrated Authentication
C#: HTTPS Windows Integrated Authentication
C# UWP/WinRT: HTTPS Windows Integrated Authentication
DataFlex: HTTPS Windows Integrated Authentication
Delphi ActiveX: HTTPS Windows Integrated Authentication
Delphi DLL: HTTPS Windows Integrated Authentication
.NET Core C#: HTTPS Windows Integrated Authentication
Excel: HTTPS Windows Integrated Authentication
Visual FoxPro: HTTPS Windows Integrated Authentication
Go: HTTPS Windows Integrated Authentication
Java: HTTPS Windows Integrated Authentication
Lianja: HTTPS Windows Integrated Authentication
Mono C#: HTTPS Windows Integrated Authentication
Node.js: HTTPS Windows Integrated Authentication
Perl: HTTPS Windows Integrated Authentication
PHP ActiveX: HTTPS Windows Integrated Authentication
PHP Extension: HTTPS Windows Integrated Authentication
PowerBuilder: HTTPS Windows Integrated Authentication
PowerShell: HTTPS Windows Integrated Authentication
PureBasic: HTTPS Windows Integrated Authentication
CkPython: HTTPS Windows Integrated Authentication
Ruby: HTTPS Windows Integrated Authentication
SQL Server: HTTPS Windows Integrated Authentication
Tcl: HTTPS Windows Integrated Authentication
Unicode C: HTTPS Windows Integrated Authentication
Unicode C++: HTTPS Windows Integrated Authentication
Visual Basic 6.0: HTTPS Windows Integrated Authentication
VB.NET: HTTPS Windows Integrated Authentication
VB.NET UWP/WinRT: HTTPS Windows Integrated Authentication
VBScript: HTTPS Windows Integrated Authentication
Xojo Plugin: HTTPS Windows Integrated Authentication

MinGW/TDM Link Errors — _time32, _localtime32, …

$
0
0

The following link errors can happen if the incorrect Chilkat C/C++ library is chosen.

For example, if you are using the TDM 4.7.1 compiler, but you downloaded the Chilkat lib for MinGW-4.6.3, then you would get these errors:

../lib/libchilkat-9.5.0.a(ChilkatTm.o):ChilkatTm.cpp:(.text+0x80): undefined reference to `_localtime32'
../lib/libchilkat-9.5.0.a(ChilkatTm.o):ChilkatTm.cpp:(.text+0x237): undefined reference to `_mktime32'
../lib/libchilkat-9.5.0.a(ChilkatTm.o):ChilkatTm.cpp:(.text+0x1df9): undefined reference to `_time32'
../lib/libchilkat-9.5.0.a(ChilkatTm.o):ChilkatTm.cpp:(.text+0x266): undefined reference to `_mktime32'
../lib/libchilkat-9.5.0.a(Psdk.o):Psdk.cpp:(.text+0xdab): undefined reference to `_time32'
../lib/libchilkat-9.5.0.a(DateParser.o):DateParser.cpp:(.text+0x3eec): undefined reference to `_time32'
../lib/libchilkat-9.5.0.a(DateParser.o):DateParser.cpp:(.text+0x42bc): undefined reference to `_time32'
../lib/libchilkat-9.5.0.a(DateParser.o):DateParser.cpp:(.text+0x43e8): undefined reference to `_time32'
../lib/libchilkat-9.5.0.a(DateParser.o):DateParser.cpp:(.text+0x43fe): undefined reference to `_gmtime32'
../lib/libchilkat-9.5.0.a(DateParser.o):DateParser.cpp:(.text+0x451c): undefined reference to `_time32'
../lib/libchilkat-9.5.0.a(TlsProtocol.o):TlsProtocol.cpp:(.text+0x2b41): undefined reference to `_time32'

Chilkat provides downloads for many different versions of MinGW and TDM here:  https://www.chilkatsoft.com/downloads_mingw.asp

An exact match is likely not necessary.  Matching the major version number, and matching the “dwarf”, “seh”, and “sjlj” is necessary, but an exact version match should not be necessary.  For example, the MinGW-w64 8.1.0 posix seh  should be valid for any MinGW 8.*.*, as long as it’s 64-bit and posix and seh..

Trying to Compress Already-Compressed Data

$
0
0

If a file or data does not compress, and the “compressed” result is slightly larger than the uncompressed input, then…

This is typical if one tries to compress already-compressed data. For example, the JPG image format
is itself a compression algorithm. The more something is compressed, the more the data resembles
a sequence of random bytes. Compression algorithms work by finding non-random sequences
and replacing them with shorter sequences. But there is overhead in storing the information required
to decompress. The act of trying to compress already-compressed is bad in two ways:

1) It tends to be the most CPU intensive input case for a compression algorithm. A lot of CPU cycles
are spent trying compress, but not much is found.

2) The overhead is larger than whatever little “compression” occurs. The result is a file
that may be slightly larger than the original.

SOAP UI WSDL to Chilkat Code

$
0
0

We have the WSDL URL (or XML file) for a SOAP service we wish to call, and we want to know how to code it using Chilkat..

Step 1.

Download and install SoapUI Open Source from here:   https://www.soapui.org/downloads/soapui.html

Step 2.

Start SoapUI and create a New SOAP Project.  We’ll name ours “utah_mfet”  (this is for the State of Utah’s Motor Fuel Excise Tax SOAP Web Service).   When creating the new SOAP project, leave the initial WSDL empty.  Just give the project a name and create, leaving all options at the default values.

Step 3.

Right-click on the project you created (utah_mfet) and select “Add WSDL”.   The WSDL url for the Utah MFET SOAP service is https://tap.tax.utah.gov/efile/MFET/WSDL/   Paste this URL into the WSDL Location

Step 4.

You should now see some SOAP methods listed, such as NewSubmission, SubmissionListByDate, etc.    Expand NewSubmission by clicking on the “+”.   You should see Request1.   Double-click Request1.

Step 5.

You’ll see the following SOAP request body:

<soapenv:Envelope xmlns:soapenv="http://schemas.xmlsoap.org/soap/envelope/" xmlns:fas="http://www.fastenterprises.com">
<soapenv:Header>
<fas:MFETHeader>
<fas:User>?</fas:User>
<fas:Password>?</fas:Password>
<fas:Environment>?</fas:Environment>
</fas:MFETHeader>
</soapenv:Header>
<soapenv:Body>
<fas:SubmissionType>?</fas:SubmissionType>
<fas:ReferenceId>?</fas:ReferenceId>
<fas:File>cid:888300920562</fas:File>
</soapenv:Body>
</soapenv:Envelope>

You can paste the above XML into Chilkat’s online tool at https://tools.chilkat.io/xmlCreate.cshtml  to generate the source code that creates the given XML.  For example, in C# the generated code looks like this:

Chilkat.Xml xml = new Chilkat.Xml();
xml.Tag = "soapenv:Envelope";
xml.AddAttribute("xmlns:soapenv","http://schemas.xmlsoap.org/soap/envelope/");
xml.AddAttribute("xmlns:fas","http://www.fastenterprises.com");
xml.UpdateChildContent("soapenv:Header|fas:MFETHeader|fas:User","?");
xml.UpdateChildContent("soapenv:Header|fas:MFETHeader|fas:Password","?");
xml.UpdateChildContent("soapenv:Header|fas:MFETHeader|fas:Environment","?");
xml.UpdateChildContent("soapenv:Body|fas:SubmissionType","?");
xml.UpdateChildContent("soapenv:Body|fas:ReferenceId","?");
xml.UpdateChildContent("soapenv:Body|fas:File","cid:888300920562");

Step 6.

In the SoapUI Request1 window, you will see a textbox with this URL:  https://txwgtwap5/efile/mfet/WSDL/
Change it to the actual endpoint.  In this case, we’ll use the test endpoint:  https://tapstaging.tax.utah.gov/efile/mfet/WSDL/

Step 7.

Click on the green triangle/arrow (top left of the Request1 windows) to send a POST.   We’re sending a POST with invalid XML, so it will fail, but at this point we’re only interested in examining the request that was sent.

Look at the bottom of the SoapUI window.  You’ll see a row of tab buttons:  SoapUI log, http log, jetty log, etc.

Select http log

Look for the POST.  Here’s what we see:

  • Wed Nov 21 11:15:49 CST 2018:DEBUG:>> “POST /efile/mfet/WSDL/ HTTP/1.1[\r][\n]”
  • Wed Nov 21 11:15:49 CST 2018:DEBUG:>> “Accept-Encoding: gzip,deflate[\r][\n]”
  • Wed Nov 21 11:15:49 CST 2018:DEBUG:>> “Content-Type: text/xml;charset=UTF-8[\r][\n]”
  • Wed Nov 21 11:15:49 CST 2018:DEBUG:>> “SOAPAction: “http://www.fastenterprises.com/MFET/NewSubmission”[\r][\n]”
  • Wed Nov 21 11:15:49 CST 2018:DEBUG:>> “Content-Length: 531[\r][\n]”
  • Wed Nov 21 11:15:49 CST 2018:DEBUG:>> “Host: tapstaging.tax.utah.gov[\r][\n]”
  • Wed Nov 21 11:15:49 CST 2018:DEBUG:>> “Connection: Keep-Alive[\r][\n]”
  • Wed Nov 21 11:15:49 CST 2018:DEBUG:>> “User-Agent: Apache-HttpClient/4.1.1 (java 1.5)[\r][\n]”
  • Wed Nov 21 11:15:49 CST 2018:DEBUG:>> “[\r][\n]”
  • Wed Nov 21 11:15:49 CST 2018:DEBUG:>> “[\r][\n]”

The Content-Type and SOAPAction are the important header fields.   Chilkat will automatically add the Host and Content-Length headers.  The other headers (Accept-Encoding, Connection, User-Agent) are unlikely to be required/needed.

Step 8:

See the Chilkat example here:  SOAP Web Service (HTTP POST)

(links for the same example in other programming languages are shown below)

Make the following changes:

  1. The online example loads the SOAP XML body from a file.  The call to LoadXmlFIle can be replaced with the code snippet (above) that builds the XML.
  2. Change the SOAPAction to “http://www.fastenterprises.com/MFET/NewSubmission”
  3. Change the endPoint to “https://tapstaging.tax.utah.gov/efile/mfet/WSDL/”

That should do it.  Try sending the SOAP request using Chilkat.


Here are links for the SOAP example in other programming languages:

Android: SOAP Web Service (HTTP POST)
Classic ASP: SOAP Web Service (HTTP POST)
C: SOAP Web Service (HTTP POST)
Chilkat2-Python: SOAP Web Service (HTTP POST)
C++: SOAP Web Service (HTTP POST)
C#: SOAP Web Service (HTTP POST)
DataFlex: SOAP Web Service (HTTP POST)
Delphi ActiveX: SOAP Web Service (HTTP POST)
Delphi DLL: SOAP Web Service (HTTP POST)
.NET Core C#: SOAP Web Service (HTTP POST)
Excel: SOAP Web Service (HTTP POST)
Visual FoxPro: SOAP Web Service (HTTP POST)
Go: SOAP Web Service (HTTP POST)
Java: SOAP Web Service (HTTP POST)
Mono C#: SOAP Web Service (HTTP POST)
Node.js: SOAP Web Service (HTTP POST)
Objective-C: SOAP Web Service (HTTP POST)
Perl: SOAP Web Service (HTTP POST)
PHP ActiveX: SOAP Web Service (HTTP POST)
PHP Extension: SOAP Web Service (HTTP POST)
PowerBuilder: SOAP Web Service (HTTP POST)
PowerShell: SOAP Web Service (HTTP POST)
PureBasic: SOAP Web Service (HTTP POST)
CkPython: SOAP Web Service (HTTP POST)
Ruby: SOAP Web Service (HTTP POST)
SQL Server: SOAP Web Service (HTTP POST)
Swift 2: SOAP Web Service (HTTP POST)
Swift 3/4: SOAP Web Service (HTTP POST)
Tcl: SOAP Web Service (HTTP POST)
Unicode C: SOAP Web Service (HTTP POST)
Unicode C++: SOAP Web Service (HTTP POST)
Visual Basic 6.0: SOAP Web Service (HTTP POST)
VB.NET: SOAP Web Service (HTTP POST)
VBScript: SOAP Web Service (HTTP POST)
Xojo Plugin: SOAP Web Service (HTTP POST)

Viewing all 414 articles
Browse latest View live